Setting up your Mac to connect to My Private Network’s VPN should take just a few minutes using the L2TP protocol. L2TP is supported on all versions of macOS / OS X. Please note that your Mac needs to be connected to the Internet and able to browse the web before moving on with the instructions below.
While we recommend using our SSL Tunnelblick application as the first option to connect to our service on your Mac, there might be some cases where this might not work well on your network. In this case, you can try this alternative L2TP VPN connection, which is much easier to setup compared to the other protocols.
Not yet registered? It’s quick and easy, Sign Up now!
Check Internet Connectivity
To check your location, please go to our IP Info page, or alternatively go to our homepage and scroll down to this section:
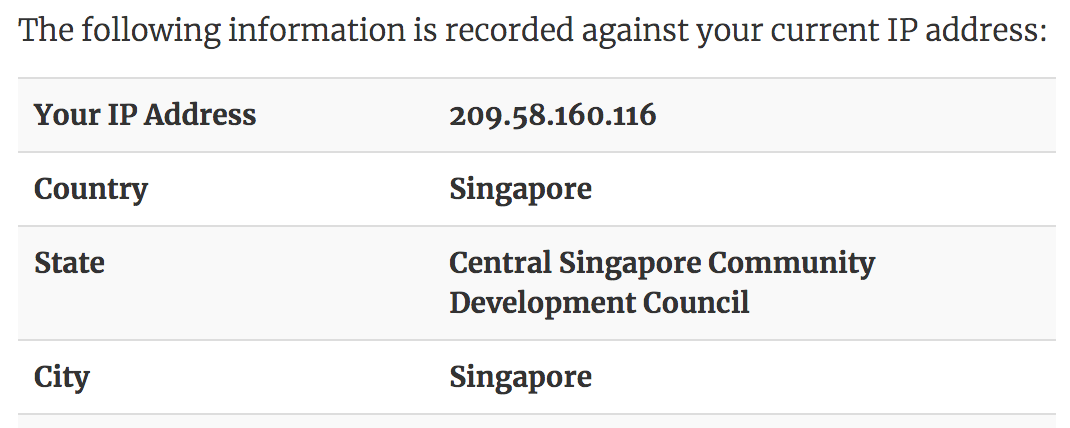
This shows the IP Address and country that you are currently connecting from, in this example, the user is connecting from Singapore.
Getting Started
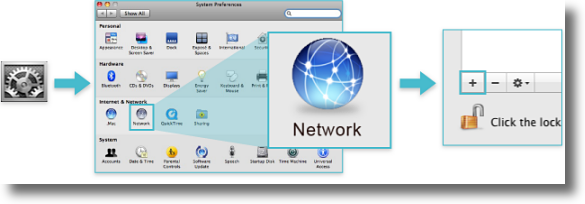
Open System Preferences and click on Network, click on the plus (+) button in the bottom left hand corner.
Choose VPN Type
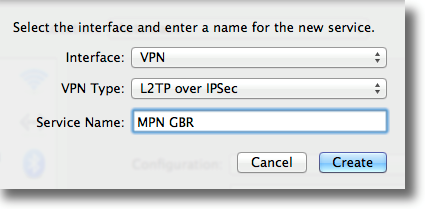
You will be prompted to select the Interface and enter a Service Name.
Select VPN for the Interface and then L2TP for the VPN Type.
For the service name, you can enter anything you like, however, we suggest you keep it simple and choose MPN GBR for the U.K service or something similar for whichever country you are connecting to.
When you’ve finished it should look like this:
Once you’re done, click on Create, and Apply.
L2TP Connection Configuration
You will now have to enter the server address. If you are connecting to our United Kingdom servers, enter gbr.mypn.co , for all other countries, please refer to our FAQ below:
Which Countries Can I Connect To?
Note: If you wish to use our Free service, the servername that you need to use is fre.mypn.co and your connection will be rotated between different countries we have in our Free VPN cluster.
For the Account Name, enter your My Private Network Username that you registered with:
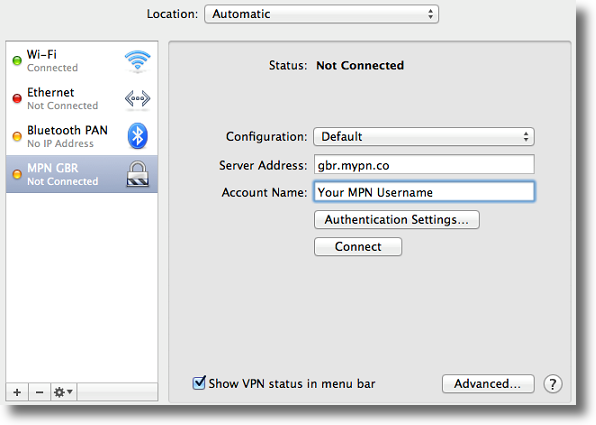
Note: Make sure the Show VPN status is menu bar is checked.
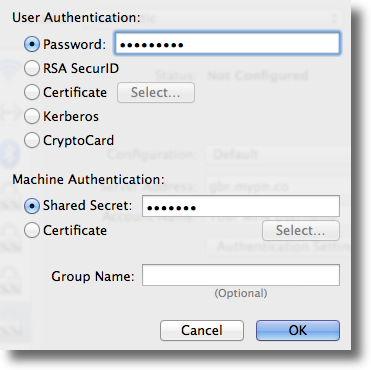
VPN Authentication Settings
Click on Authentication Settings and enter your My Private Network Password in the Password field. For the Machine Authentication, select Shared Secret and enter the word private and click OK.
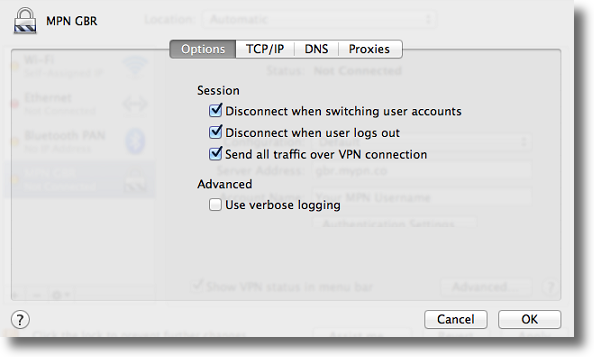
Click on the Advanced tab and make sure that Send all traffic over VPN connection is checked. Click on OK and click on Apply. You may now close the network window.
Enabling VPN Connection
Click on the VPN icon in the status bar and click Connect MPN GBR (this assumes you called the connection MPN GBR).

The icon will show that it is connecting and once connected the timer will be displayed to the right of the icon.

You are now connected
If you now check your IP address again from the IP Info page, your location should show that you are now in the U.K (or which ever country you have connected to).
Note: The server IP address and country name will vary depending on the server or country you are connected to.
Any problems?
Unfortunately it doesn’t always go to plan!
If you have any problems or can’t get connected, please email us at This e-mail address is being protected from spambots. You need JavaScript enabled to view it. We’ll get back to you as soon as possible and try to help.