The UUID is a Universal Unique Identifier.
In relation to our Smart DNS service, MyTelly , we use it to allow you to register your location or IP address without having to log in to our website. This makes it really easy to ensure that your IP address is always registered.
Most home internet connections use dynamic IP addresses, this means that although they stay the same for long periods, when your router is restarted or your ISP restarts something their end, you get a different IP address. It doesn’t happen often, but when it does you’ll need to register your new address with us before you can watch anything.
This does not seem to be much of a problem, but when the other members of your household are on the phone asking why the supported online TV such as Hulu or BBC no longer works or you’ve just got into bed, switched on the Apple TV or Roku to watch something and it doesn’t work, you’ll realize what a pain this can be.
Also, if you are moving around, i.e not on the same network, you need to register again each time you move to a different connection.
Using our UUID registration system can vastly simplify this or even automate it so you don’t have to login to our website each time you need to authenticate the new IP address with your account.
To start using the UUID feature for MyTelly , firstly you need to identify your address by following the steps below:
- Login to our website
- Click on MyTelly > Setup
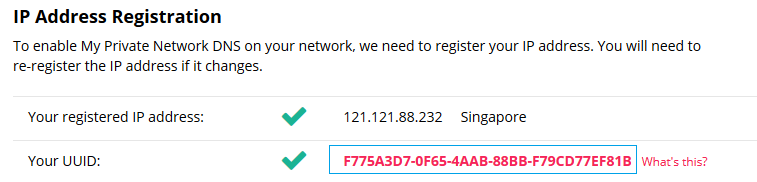
- Click on the unique line of characters from the Your UUID and it will open the full URL in a new tab as per example below:

The page will be empty except for the line that state (“SUCCESS”) indicating your IP has been successfully registered.
Take note of the UUID URL for your account as this is required when you wish to automate the registration process on your network as below:
Internet Browser
Bookmark the UUID URL and launch this page before accessing any other supported TV websites.
This can be done on all devices that has an Internet browser i.e mobile phone, computer, consoles.
Task Scheduler (Windows computer)
This method will register the IP address each time the computer is turned provided it has an active Internet connection.
To set this up on your Windows computer, please follow the steps in the link below:
Update MyDNS IP address automatically via Task Scheduler (Windows)
Cronjob ( Mac / Linux )
If you are on a Mac or a Linux system, you can automate the IP registration via Cron.
Open Terminal.
Type crontab -e to create a new cronjob and enter the line below:
* * * * * curl https://client.my-private-network.co.uk/updateIP.php?uuid=F7XX3D7-0F6X5-4XXAAB-88BB-FXXXXXXX > /dev/null 2>&1
Note: The UUID above is just an example, please replace it with your UUID that you get from your accounts page and ensure the command is in a single line.
Save the cronjob and exit back to the Terminal.
Type in crontab -l to confirm the cronjob is added to the list correctly.
The above command will basically register your IP address every minute when the computer is turned on, you can change the frequency as you prefer i.e every hour, daily, weekly etc.
Cronjob ( DD-WRT routers )
If you have a router that is flashed with DD-WRT, you can actually set up a cronjob on it as it runs on a modified version of Linux.
To do so, login to your DD-WRT router page and head to Administration > Management.
Scroll down to Cron and set this to Enable.

Enter the cronjob into the Additional Cron Jobs field
* * * * * curl https://client.my-private-network.co.uk/updateIP.php?uuid=F7XX3D7-0F6X5-4XXAAB-88BB-FXXXXXXX > /dev/null 2>&1
Note: The UUID above is just an example, please replace it with your UUID that you get from your accounts page and ensure the command is in a single line.
The above command will basically register your IP address every minute as long the router is turned on, you can change the frequency as you prefer i.e every hour, daily, weekly etc.
Scroll down and click on Apply to save the changes.
Any Problems?
If you need further assistance or clarification on how to use this on your network, please drop us an email at [email protected] and we will be happy to help.