Certain devices such as the Google Chromecast have built in DNS settings designed to redirect all DNS queries to a particular server. To circumvent this, we’ll need to set up a static route on your router that will instead push all DNS queries to use MyTelly.
From our experience, the best routers that give you full customization are those that can be flashed with custom firmware such as DD-WRT, Tomato, OpenWRT and RouterOS (Mikrotik) based routers. In this tutorial, we’ll walk you through setting up a static route that is available on a much wider range of Linksys routers and will work in the same way as a custom firewall rule.
Step 1: Getting Started
Login to our website, www.my-private-network.co.uk from your computer browser and you should be redirected to the My Subscription page.
Select the MyTelly tab on the left hand corner of the screen and click on Setup.
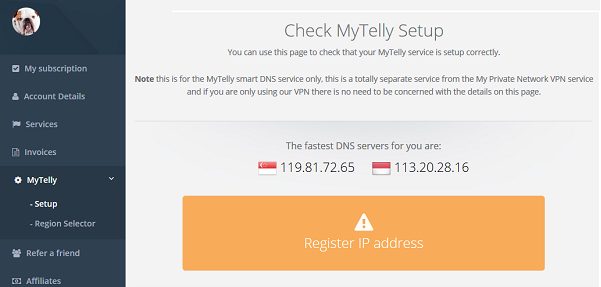
Take note of the fastest DNS servers address that appears on screen.
Step 2: MyTelly Configuration on Linksys router
Login to your Linksys router user interface and click on Setup. In this example, our router IP address is 192.168.1.1
If you are not sure, connect to the router’s network and check your network gateway address following the steps in this link below:
How to find your Default Network Gateway
Once you’ve accessed the router configuration page, you should see a similar screen to the one below:

Now go to the Network Setup section on the main screen and enter the DNS addresses that you see in your MyTelly option.

Now click on Save Settings.
Step 3: Static Route setup on Linksys router
Next, please click on Advanced Routing which can be found on the top banner.
Once you’ve clicked on Advanced Routing please enter the following information:
Enter Route Name: Google 1
Destination: 8.8.8.8
Subnet Mask: 255.255.255.255
Gateway: 192.168.1.99 (Please note that you would have to set your Gateway to an IP that doesn’t exist in your Network. You would have to refer to the IP Address and Start IP Address as per the Network Setup.)
Once that is done, click on Save Settings and select the next route entry to edit.
Please enter another field with the following:
Enter Route Name: Google 2
Destination LAN IP: 8.8.4.4
Subnet Mask: 255.255.255.255
Gateway: 192.168.1.98


Once the information above has been entered, please click Save Settings and reboot your router.
Now that the settings have been confirmed, any device that re-routes to Google’s DNS servers will be pushed through MyTelly instead.
Step 4: MyTelly IP Registration on Network (Completion)
Head back to the MyTelly page, scroll down and click on Register This Address.
This will register your IP address and also test your DNS setup and indicate whether you have changed the DNS settings correctly.

You will get Your DNS is configured correctly! Enjoy! message on your screen if your DNS has been set successfully in our system.
Note: If you get Your DNS is not configured error message, please try again in a few minutes or reboot your router.

Note: you will not have to do it again unless your IP address changes. Also, any device on the same network will be able to use the service since the DNS is already set on the router itself.
Now that you have setup and registered your system you can go ahead and access the TV sites that can be accessed with the service!
Any Problems?
Unfortunately it doesn’t always go to plan!
If you have any problems or can’t get connected, please email us at [email protected]. We’ll get back to you as soon as possible and try to help.