Unfortunately, certain devices such as the Google Chromecast have built in DNS settings designed to redirect all DNS queries to a particular server. To circumvent this, we’ll need to set up a firewall on your router that will instead push all DNS queries to use MyTelly.
While many routers in the market allow you to set up manual DNS servers on them, unfortunately not many allow you to set up a custom firewall. From our experience, the best routers that give you full customization are those that can be flashed with custom firmware such as DD-WRT, Tomato, OpenWRT and RouterOS (Mikrotik) based routers.
This guide will walk you through setting up a DD-WRT router to use a firewall to restrict all outgoing DNS queries and push them to use MyTelly servers instead.
Before we begin, we’d just like to inform you that while the firewall rules listed in this guide can theoretically be used on any router(even those that are not set up to use DD-WRT firmware) we have only tested this rule on a handful of routers and so we can’t confirm that it will work on all routers on the market.
Step 1: Getting Started
Login to our website, www.my-private-network.co.uk from your computer browser and you should be redirected to the My Subscription page.
Select the MyTelly tab on the left hand corner of the screen and click on Setup.
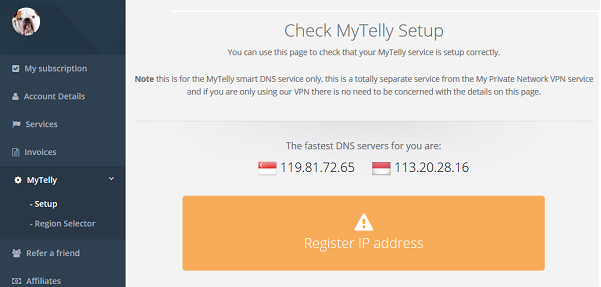
Take note of the fastest DNS servers address that appears on screen.
Step 2: Firewall setup on DD-WRT router
Login to your DD-WRT router user interface and enter your router’s credentials.
In this example, our DD-WRT IP address is 192.168.1.1 but it might differ for yours.

If you are not sure, connect to the router’s network and check your network gateway address following the steps in this link below:
How to find your Default Network Gateway
Once logged in, click on the Administration tab and on the Commands tab.
In the Commands box, enter the following firewall rule:
iptables -I PREROUTING -t nat -p udp -d 8.8.8.8 –dport 53 -j DNAT –to-destination (The DNS address that appeared on MyTelly Setup page)
iptables -I PREROUTING -t nat -p udp -d 8.8.4.4 –dport 53 -j DNAT –to-destination (The DNS address that appeared on MyTelly Setup page)

For example, the rule will look something like this below:
iptables -I PREROUTING -t nat -p udp -d 8.8.8.8 –dport 53 -j DNAT –to-destination 119.81.72.65
iptables -I PREROUTING -t nat -p udp -d 8.8.4.4 –dport 53 -j DNAT –to-destination 113.20.28.16
Now click on Save Firewall to apply and save the settings.
This will now ensure that all Google DNS (8.8.8.8, 8.8.4.4) queries sent from any device on your network will be redirected to use the DNS addresses you’ve set in the rule above.
Step 3: MyTelly IP Registration on Network (Completion)
Head back to the MyTelly page, scroll down and click on Register This Address.
This will register your IP address and also test your DNS setup and indicate whether you have changed the DNS settings correctly.

You will get Your DNS is configured correctly! Enjoy! message on your screen if your DNS has been set successfully in our system.
Note: If you get Your DNS is not configured error message, please try again in a few minutes or reboot your router.

Note: You will not have to do it again unless your IP address changes. Also, any device on the same network will be able to use the service since the DNS is already set on the router itself.
Now that you have setup and registered your system you can go ahead and access the TV sites that can be accessed with the service!
Any Problems?
Unfortunately it doesn’t always go to plan!
If you have any problems or can’t get connected, please email us at [email protected]. We’ll get back to you as soon as possible and try to help.