While we recommend using our OpenVPN application as the first option to connect to our service on Windows OS, there might be some cases where this might not work well on your network.
In these cases, you can try our alternative IKEv2 VPN connection, which connects fast and are known to be more stable on mobile networks compared to the other protocols.
Even though the Windows OS interface has gone through visual changes on on every iteration of their system, the underlying Network Control Panel are still the same so the steps below will work if you are on Windows 7 to Windows 10.
To set up the IKEv2 connection, please follow the steps below:
SETTING UP IKEv2 VPN CONNECTION
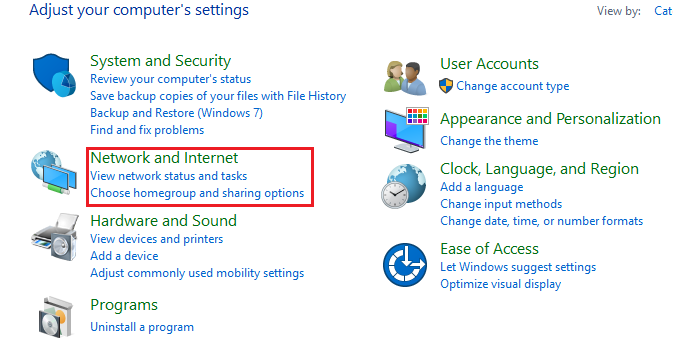
1) Go to Start > Control Panel > Network and Internet.
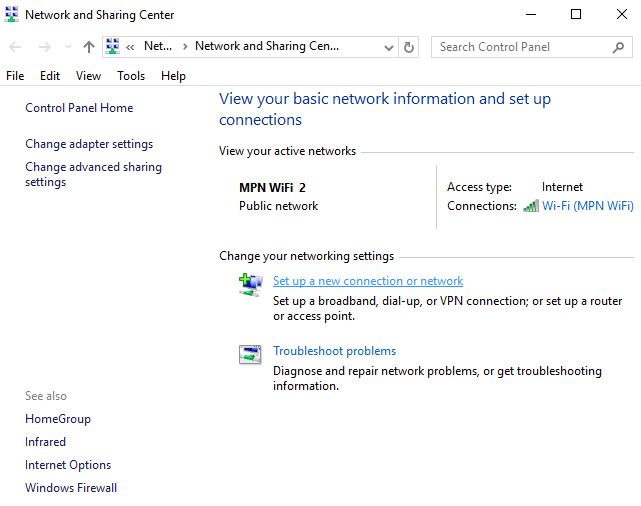
2) Click on Network and Sharing Center and click on Set up a new connection or network.
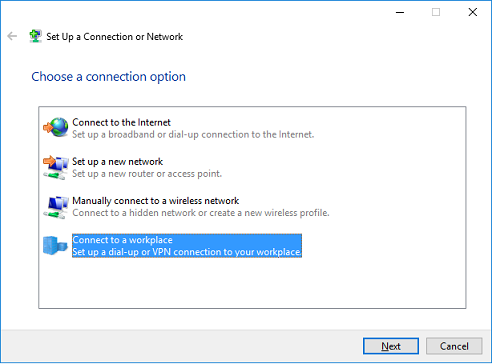
3) When prompted to choose a connection option, choose Connect to a workplace and click Next.
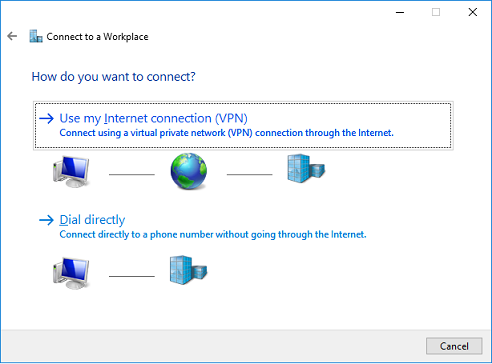
4) Click on Use my Internet connection (VPN).
5) Enter your VPN details as the example below:
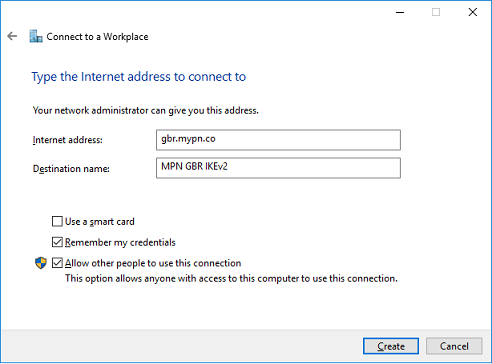
Internet address: gbr.mypn.co
Destination name: MPN GBR IKEv2
Note: If you want to connect to any of our other servers, (ie. our USA servers) simply change the Connection name and server name. For a list of server names, please refer to our complete list of servers.
6) Tick the checkbox Remember my credentials if you wish to save the login details and click Next.
7) Enter your My Private Network Username and Password that you have registered with us.
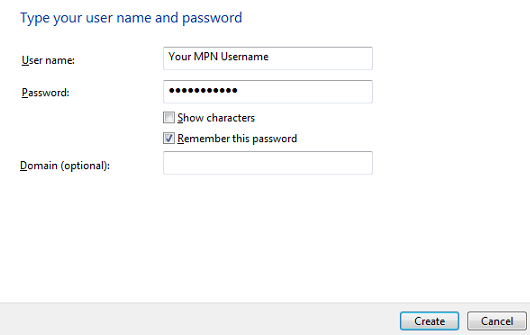
8) Leave the Domain (optional) box empty and click Create.
9) It’ll now say The connection is ready for use, click on Close.
10) You’ll be returned to the Network and Sharing Center again, click on Change adapter settings.
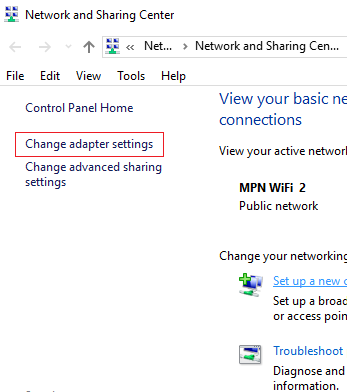
11) Scroll down and click on Change Adapter Settings.
CHANGE VPN SETTINGS
1) You should now be able to see the VPN connection that you’ve set up. i.e. MPN GBR IKEV2.
2) Right click on your VPN icon and select Properties.

3) The properties window will be displayed. Click on the Networking tab and select Internet Protocol Version 4 (TCP/IPv4) is selected.
4) Click on Properties.

5) Leave the settings as it is and click on Advanced Settings.

6) In the IP Settings tab, ensure the Use default gateway on remote network and Automatic metric is checked.

7) Click OK again to save the settings and close the dialog box.
CONNECT TO THE VPN
1) Once you back in the Network Adapter page, double click on the connection that you have just created enter the details if required.
Note: If you want to create a Desktop shortcut for the VPN, you can simply drag the MPN GBR IKEv2 icon from this window onto your Desktop.
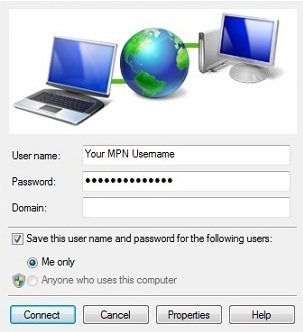
Click Connect.
Note: You might get some warning prompt , just proceed with the connection attempt.
If you now browse our homepage or check your IP address again from the IP Info page, your location should show that you are now in the UK (or which ever country you have connected to).
CHANGE ANYTHING?
If you entered the wrong username and password or you want to change the server name, just select the VPN connection again and click on Advanced Option > Edit and make the necessary changes.
ANY PROBLEMS?
Unfortunately, it does not always go to plan!
If it does not connect, please try rebooting your Internet router (if you are using one) and also completely power off your device and then switch it back on.
If you continue to have problems or need any further information, please send us an email to [email protected] and we will do our best to assist you.